From Trackpedia
If you know this track, please contribute! Just click the edit button on the top of the page or the right and go.
The HST events at Hallett provide good information for beginners and seasoned racers, as they lead the first sessions of cars around the track following "the line". In summary, nearly every turn at Hallett needs to be taken quite deep to maximize time on-throttle and minimize lap times. The track is notoriously hard on brakes - especially on heavier cars. Spec Miata cars are very prevalent, and despite a lack of horsepower, make it around the 1.8 mile circuit in aggressive times. The HST classes see everything from Fiero's and Camaro Z28's to Vipers, Testarossas, and more Z06's than you can shake a stick at.
Track Map
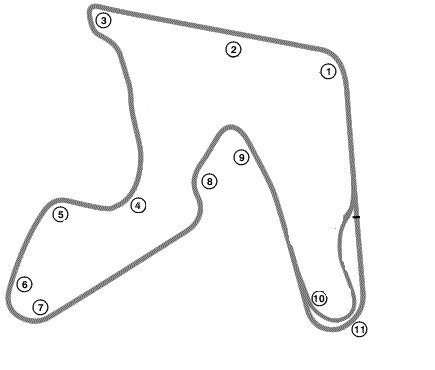
Built near Hallett, Oklahoma and described as 'Two miles of the Nurburgring plunked in the middle of America' during a 70s IMSA race, Hallett Motor Racing Circuit is a classic late apex circuit boasting two turn complexes where the track changes direction at the crest of a hill and offers the option of racing in either direction. The track was laid out over thrity years ago with stakes pounded in the ground by Cannonball Baker Sea-To-Shining-Sea Memorial Trophy Dash regular Anatoly Arutunoff (son of Armais Arutunoff who developed the REDA pump, an electrical submergible motor and pump that revolutionized the oil patch) and stands as one of the greatest, safest club racing facilities in the nation. By the way, the circled numbers in the map above define the F&C stations around the track but not necessarily the numbers used to identify the turns.
I was caretaker and lived on the property the first two full seasons of operation and have driven everything from large trucks to pickups, street sweepers, rally cars, open wheel race cars, Spec Racers, sedans, a 50cc Benelli and even a bicycle around there in daylight, dark, rain, snow, ice & dust. I also had a hand in erecting most of the tire walls that make HMRC one of the most forgiving tracks in the world for those drivers who find themselves off-tarmac. In fact, the only immovable structure that competing cars are exposed to is a chunk of Armco in the Hot Pit lane.
Almost every feature of HMRC has a name. There's the Dead Horse Turn, the Compormise Turn, the Cimarron Straight, the "Bitch," and three man-made bodies of water - Veronica Lake (west of the main paddock area), Lenny Pond (inside the spectator parking area south of the Cannonball Baker Memorial Straight), Loch Mess (the mostly dry sewage lagoon outside Turn One) and more.
I'll close by stating two things here that I have shared during my many instructor forays at the track (including Chief Instructor at an SCCA DS in 1998), "Learn the fast way around Hallett and you can quickly find the fast way around any track anywhere" and "You can give up a little going in to any of Hallett's ten turns to get a lot coming out" (American Rally star John Buffum describes this mindset, "In like a lamb, out like a lion.").
Sincerely,
M. E. "Mad Mike" Halley - RealAutoSport, LLC
www.realautosport.com
Counterclockwise (Normal) Direction
Turn 1
I've found that this turn can be taken much faster than what your car may make you feel. Racing a fully prepared Datsun 240Z, it felt very fast in 3rd gear floating the trottle, but the car actually could handle this turn in 4th gear, throttle wide open.
-patrick260Z
The approach speed for this turn on most cars is between 85 - 115 MPH. Well balanced cars should be able to take the turn at approximately 80 MPH or better.
Turn 2
Turn 3
The complex at 3 includes a sharp left hander, followed by a short, easy left/right kink. The line here involves taking the car in very deep on the outside (right), then turning sharply in to apex. Apply full throttle post-apex to attack the left-right combo, taking the line as straight as possible. This will naturally position you on the left going up-hill toward 4.
Cars that get it wrong in 3 will have turned in too early, or carried too much speed through the hairpin, resulting in oversteer and spins at the second left-hander or prior to the right hander out of the complex. The turn-in at 3 is not the place to gain time - resist the temptation to over-drive it.
Turn 4
Turn 4 is basically a decreasing radius curve that appears to start just below the crest of the hill. Get familiar with the turn-in points at lower speeds before attacking this section. This turn, like all at Hallett, should be taken very deep, so that you exit on the far right side of the tarmac. There is a small white square painted at a sufficiently aggressive turn in point on top of the hill, on the left side. If your left front tire hits this square, your turn at 4 should position you well for an attack on 5. The transition from 4 to 5 comes fairly quickly on a hot lap - probably 3rd gear in road cars. The only braking required between 4 and 5 is to set your speed at the turn-in on four.
Turn 5
You'll naturally get a lot of weight transfer to the outside as you approach turn 5 - especially if you didn't go deep enough into 4. A well balanced car should be able to take this turn fairly quick, but heavier vehicles and hot tires can lead to a tank-slapper or shunt. You can get back on-throttle before apexing turn 5, leading downhill to 6.
Turns 6 and 7
The complex at 6 and 7 is a double-apex turn. Carry the car very deep into 6 on the right side of the tarmac, and look to a spot just past the white-red paint on the inside (just before the straight leading to turn 8). After making this turn properly, you should be back to full throttle exiting 7 fairly quickly. Again, like most turns at Hallett, you need to go in deeper than you'd anticipate, and use all the road.
Turn 8
The setup for turn eight to be properly aligned for turn 9 is simple. As you enter turn eight look over the hill... there will be a billboard sign. Aim straight for it, and it will take you right to the apex of eight and, with enough speed, carry you over to turn nine.
-patrick260z
This complex (8 and 9) have been nicknamed "Bitch", for good reason. Approaching 8, set the car with the brakes quick and hard once, taking the left-hander somewhat deep. You may not see a billboard, but you will see either a telephone pole in the distance, or a traffic cone at the apex of the right-hander at the crest of the hill. Take a straight line from the inside of the first left-hander, close to the cone (apex) of the right-hander, and on to the bottom of the hill on the far left of the tarmac.
Turn 9
Coming out of 8 on-line and under late braking, you quickly return to throttle and apex 9 by touching the rumble strip on the inside (right), leading back out to the left rumble strip going up the hill to the back straight. Extend the turn very gradually to the right to set up for 10.
Turn 10
Approach the carousel at 10 from the far right, and brake very deep into the turn. Done properly, you can return to throttle quickly and stay on it, touching the inside rumble strip just before the storm grates. An approach into 10 in a road car should be between 80 - 100 MPH. Cars get it wrong here by using too much throttle too early, or not going deep enough - both often result in either a spin or an excursion into the field to the right of the track.
Clockwise (Reverse) Direction
Turn 1
Turn 2
Turn 3
Turn 4
Turn 5
Turn 6
Turn 7
Turn 8
Turn 9
Turn 10